


Happy 2020! Have you had to sign anything in the last few days?? I’ve already written “2019” at least twice… You know how it is. With the new year, I wanted to share a few ways you can save money shopping in 2020 by making an Excel cost per wear spreadsheet. I first shared my obsessive Excel clothing spreadsheet in a blog post back in June, and it was such a hit that I wanted to explain how to make your own as we enter the new year. And of course, how to use it to get the most out of your closet and your clothing budget!

Check out the original blog post from June at the link below:
My Obsession with Cost Per Wear and Excel Spreadsheets
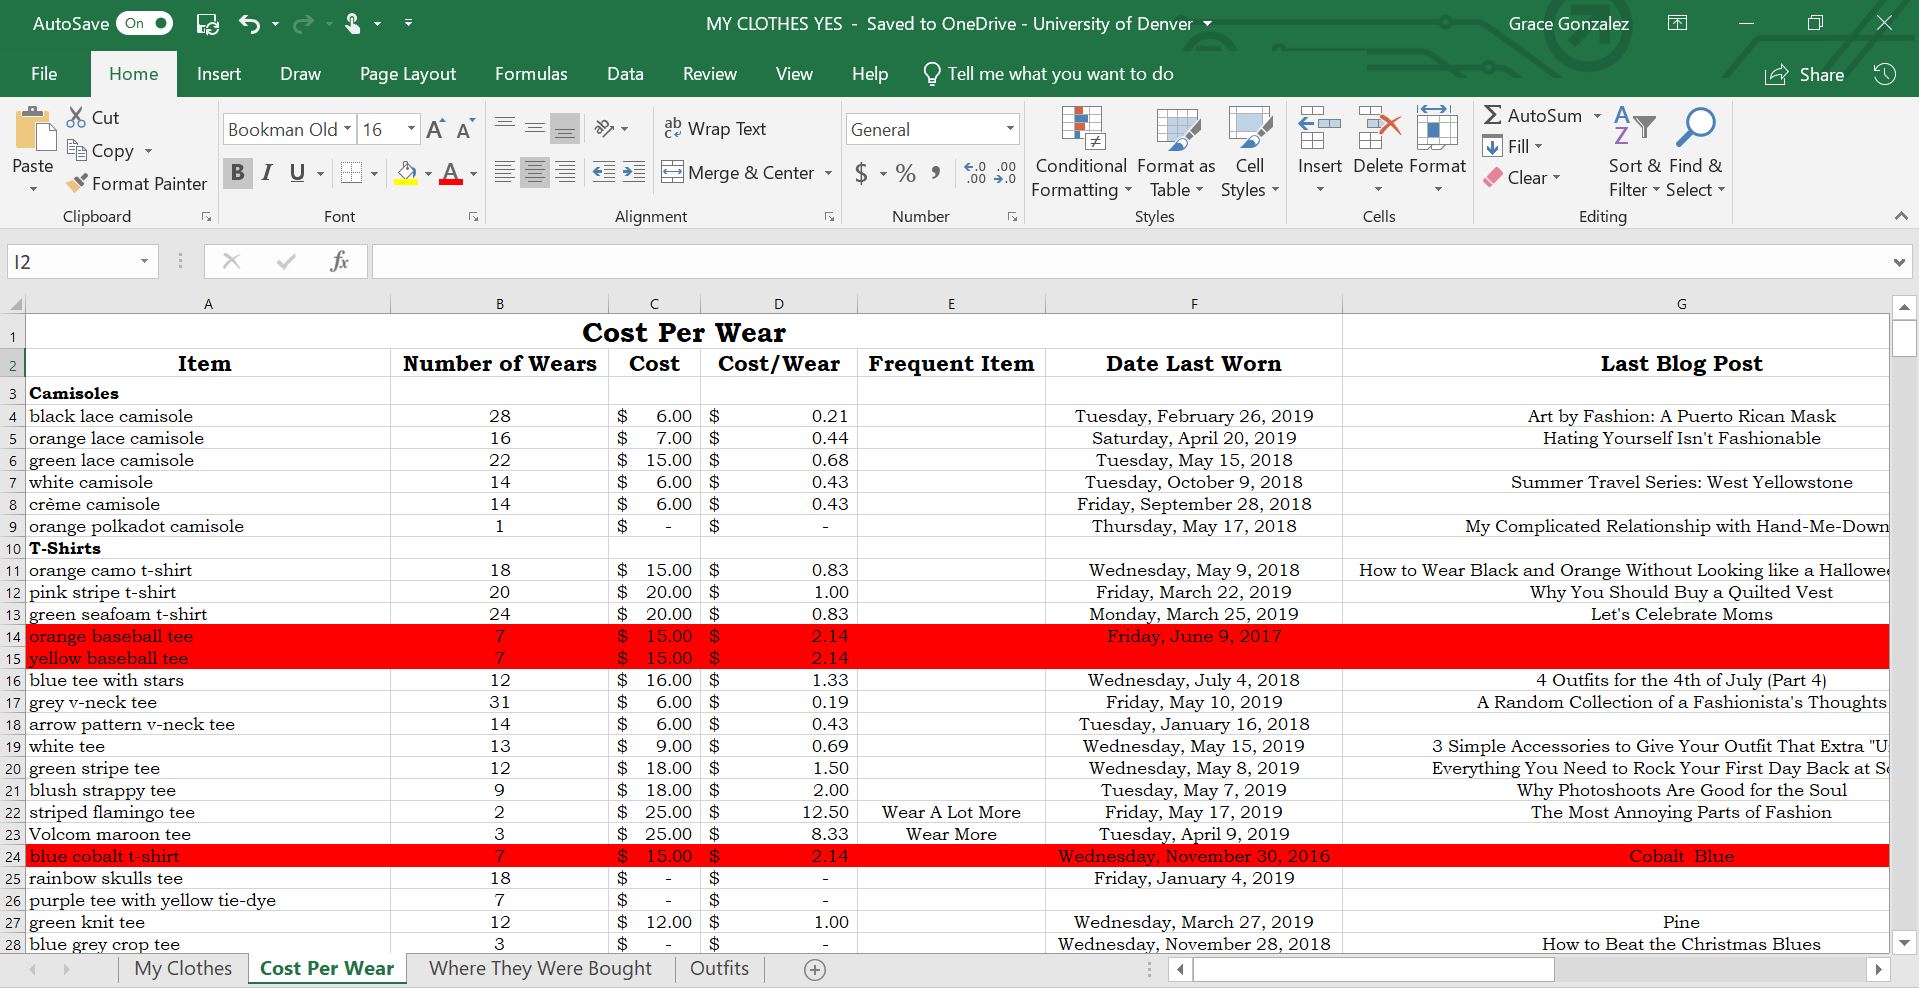

As you can see from this screenshot of my spreadsheet, I keep track of a lot of stuff: cost per wear, the date I last wore the item, and the last blog post in which the piece was featured (and that’s only one sheet of the spreadsheet!). As a fashion blogger, I obviously have a lot more reason to keep track of weird clothing-related stuff like that (did I mention, obsessive?). But if you’re just looking to save money this year while out shopping, here are three ways to use a clothing inventory and cost per wear spreadsheet to do so:


- Keeping track of the clothing you own and how often you wear certain pieces makes you more aware of the items you already have in your closet (like the forgotten shirts that get shoved to the back of your drawer). By actively keeping this inventory in the form of an Excel spreadsheet, you can save money shopping by avoiding purchasing items similar to pieces you already own. Let’s say you see a really cute green jacket in Francesca’s that you feel you just can’t live without. But then, you remember your cost per wear spreadsheet (or better yet, you have a PDF form of the spreadsheet on your phone), and you realize that you already have a very similar green military jacket from Nordstrom Rack. No need to have two of the same item, so BOOM—you save $50 by not purchasing the jacket.
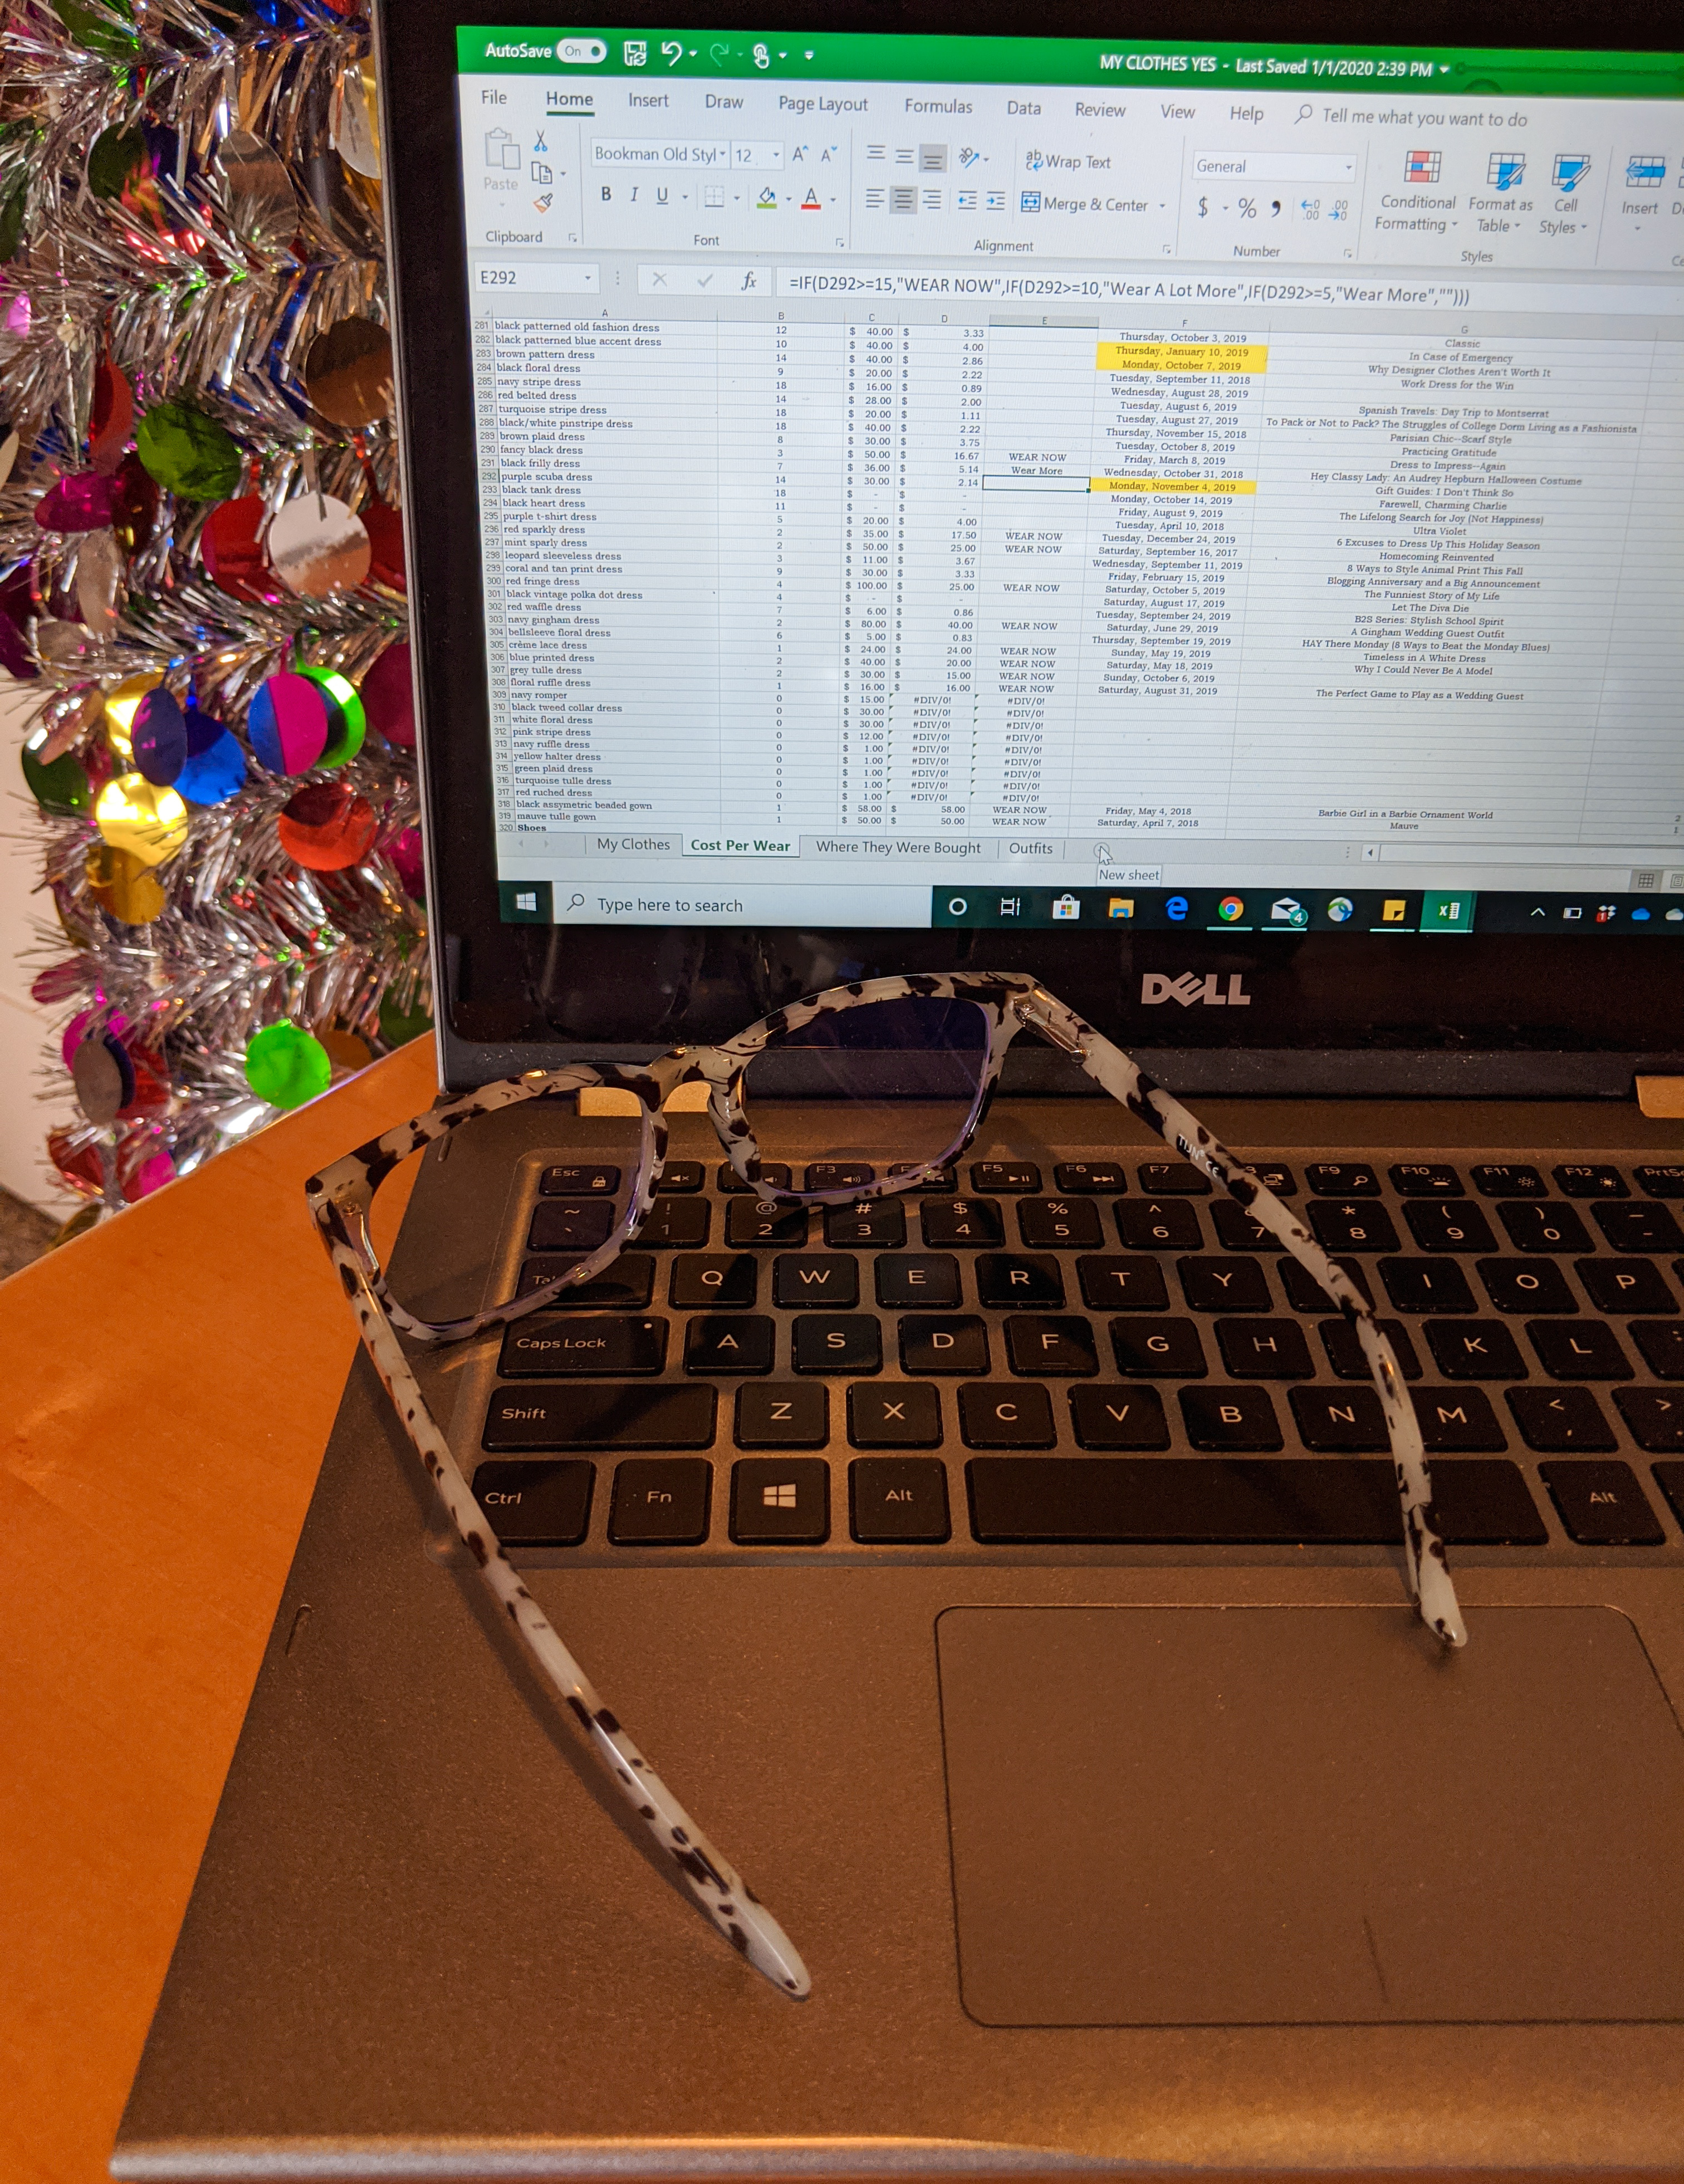
- A cost per wear spreadsheet is also really helpful in showing you what you don’t wear very often. I programmed my spreadsheet to have a column that tells me how much I need to wear certain items, with warnings like “WEAR NOW”, “Wear A Lot More”, and “Wear More”, in order to help me lower the cost per wear. Knowing what you don’t wear very often (i.e. the items you don’t like, that don’t fit very well, or that don’t go with much) is extremely useful when shopping because it makes you more cognizant of styles to avoid buying in stores. Notice that you never wear pieces from your closet that have flared sleeves? Your turtle necks are too uncomfortable? The shoes you own with straps across the ankle drive you crazy? Picking up on patterns like those helps prevent you from buying something you’re most-likely never going to wear, no matter how much you think you like it or how cute it appears in stores.
- Most of all, maintaining a cost per wear spreadsheet helps you save money in the long run by getting as much wear out of your pieces as possible. If you’ve only ever worn a shirt once, and it cost $40 originally, that’s a very expensive cost per wear. But if you notice you never wear that shirt and you make it a goal to wear it more often, the cost per wear will decrease, and you won’t feel like you wasted the money you spent on the shirt.


Have I convinced you to make your own spreadsheet yet? Those three reasons have definitely saved me money while shopping in the past, especially knowing what I already have so I’m not tempted to purchase a nearly-identical item. Not only is it extremely satisfying to watch the cost per wear decrease over time, but it’s also surprisingly easy to create your very own spreadsheet. Here are the steps to do so in order to start saving money now:
1. Open an Excel document (or spreadsheet equivalent) and fill the first column (Column A) with the items of clothing you want to track (I don’t include pajamas, casual t-shirts, and athletic clothes—only my “nice” clothing). Be sure to label your items as something descriptive so you’ll know what piece you are talking about.
2. Label the second column (Column B) as “Number of Wears”. Since you’re just starting out, you can either enter every clothing item as 0 wears, or you can estimate how many times you’ve already worn the piece in the past.
3. Label the third column (Column C) as “Cost”. I have a strangely good memory when it comes to recalling the prices of items, but if you can’t remember how much you paid for an old item, make your best guess. Your cost per wear spreadsheet will get more accurate with time as you add more wears and pieces. In the Home bar at the top of the spreadsheet, find the section labeled “Number”. Select Column C by clicking on the C (so that the entire column is highlighted – see the red oval in the photo below), and in the Number section, click the dropdown labeled “General”. Find the “Accounting” option (see the big red arrow below), and click on it. Now your “Costs” will appear with dollar signs, as shown in the following screenshot.


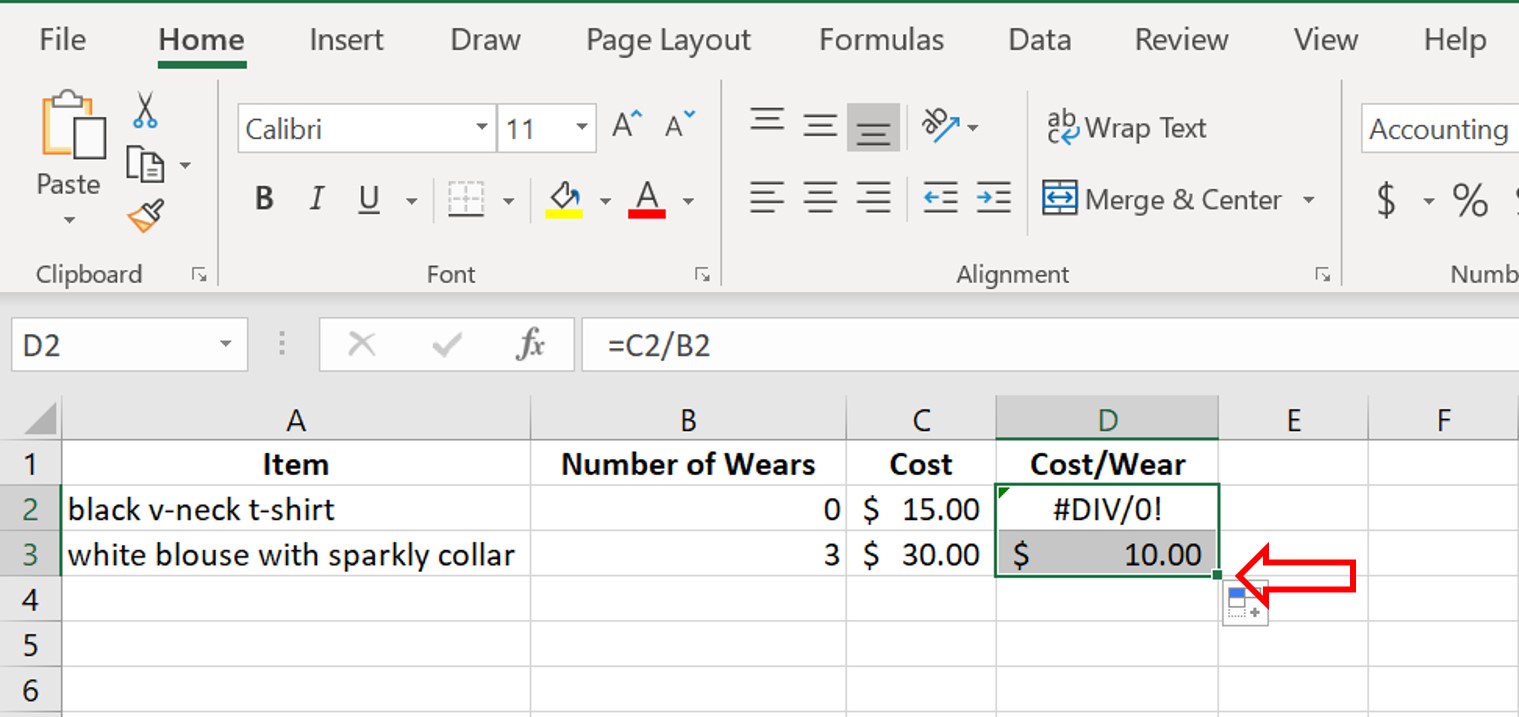
4. Label the fourth column (Column D) as “Cost Per Wear” and format the column to be “Accounting” as you did for Column C in Step 3. Then, in cell D2, enter an equals sign, followed by C2/B2 (check out the red oval in the photo below). Hit enter, and your cost per wear for the first item will be calculated! If the “Number of Wears” is 0, an error will occur in the Cost Per Wear column – but don’t worry, this will go away once you start logging the number of wears.


5. As you log more items, number of wears, and prices in your spreadsheet, you can “translate” the formula to other cells automatically by clicking the little black box in the bottom right-hand corner of cell D2 and dragging it downwards. This makes it so you don’t have to manually enter the cost per wear formula for each row! See the screenshot and red arrow below to know what I’m talking about (I know this can be super confusing). Check it out – the cost per wear for the white blouse automatically calculated as $10. Pretty cool, right?!

And voila! Just like that, you can have your very own, very simple cost per wear spreadsheet. Mind you – it will take a while to create, just because you have to enter every piece of clothing you want to include. But once you have the spreadsheet set up, it only takes a few minutes every day to log which items you wore (increase the “Number of Wears” by 1 and the formula will do the rest automatically to calculate cost per wear!).
You can either incorporate updating your spreadsheet into your nightly routine, or you can just do it whenever you have a spare second during the day. I usually update mine while in class – whoops! You can also log a week’s worth of outfits at the end of the week. If you choose this method, I find it useful to update the spreadsheet on laundry day, so your dirty clothes will jog your memory of what you wore. Experiment and find a method that works for you. And remember, if you miss a day here or there, it’s not a big deal. Maintaining the spreadsheet at all will remind you of items you already own and of pieces you don’t wear often, which will help save you a lot of money while shopping for new pieces.


So what do you think?? Will you be creating your own cost per wear spreadsheet anytime soon? I realize it’s obsessive, but I really do enjoy keeping track of what I wear and watching the cost per wear decrease over time. It also helps me get more creative with my outfits because I try to incorporate the pieces I don’t wear as much. So fun! And nerdy!
Anyway, I hope you all have a fantastic Monday. Today was my first day back at school – eek. Also, side note, what do you think of my new glasses?? They’re just blue light glasses, but I asked for them for Christmas because I’ve always thought glasses are so cute, hehe. Yes, I admit, I only have them for the fashion… But I’ll let you know soon if they actually help reduce side effects from staring at a screen all day.
Thanks for stopping by, and enjoy the rest of your Monday!
Miles of smiles,
Grace
White Short-Sleeve Sweater: Bohme Boutique, $30, shop a similar white short-sleeve sweater HERE // Tuxedo Stripe Jeans: Bohme Boutique, $40, shop similar tuxedo stripe jeans HERE // Pink Headband: Francesca’s, shop similar headbands HERE // Blue Light Glasses: Amazon, $16, buy exact pair HERE